 |
| No Curls, No Styling, Blah! |
I have had a one length haircut my entire life. Bad decision for my type of hair! Since my hair is thick and long, it tends to weigh down any potential curls and create a messy wad of frizz. :/ So I just added one long layer in my hair and it instantly lifted the curls and created movement I never knew was there!
Attention! Step 1 is the most important step for fixing lifeless, wavy hair. Get your hair layered!
Step 2: Regular Haircuts.
It's not absolutely necessary to have your hair cut every 6 weeks. God knows we can't always afford that! But you should try to have your hair trimmed at least once every 3 months so the split ends don't travel halfway up to your scalp and break off. Unmaintained split ends create A LOT of frizzy flyaways.
Step 3: Always use Conditioner after Washing Hair.
Depending on how oily your hair is, you don't have to wash your hair everyday. In fact, it's better to shampoo less often and give your hair a day or two between each washing. Shampooing tends to dry out your hair (which causes frizz!) But regardless of how often you shampoo, always use a conditioner on your hair. Start a few inches away from your scalp and leave it on for a few minutes. This will bring out natural shine and keep your hair healthy and strong.
Step 4: Use Gel for Curly Hair.
After showering, apply a liberal amount of gel into your hair. I use Sunsilk Captivating Curls gel & cream twist because not only is it cheap ($4 at Walgreens) but it really helps define curls and rid frizz without creating a "crunchy" or "sticky" hair feeling. No matter how much gel I use, my hair remains soft and "normal" after styling.
Any other tips on good gels to use would be greatly appreciated!
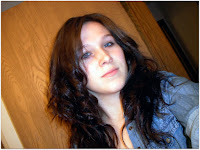
 |
| Before Styling Curls |
Let your hair air dry. My hair takes a good 2-3 hours for it to dry completely. So while you are waiting for it to dry do not, I repeat DO NOT touch your hair at all! Leave it be. Don't lay against a pillow. Don't twirl it around your finger. Don't sweep it behind your ears. DO NOT TOUCH IT. I promise that messing with your hair will only create more frizz. If your hair is like mine, the frizz will only reduce the amount of beautiful potential curls that will appear!
Note: I realize this is not as easily doable with everybody's busy life schedules. However, on the weekend just try this and you may find yourself amazed! I'm only able to do this with my hair once or twice a week. If I don't do this I usually end up pulling out my hair straightener and away goes the curls. :(
 |
| Touched Up Around Face |
Now that your hair is dry you can use a flat iron to fix any frizz that did not cooperate. Just curl different sections to shape your hair how you want. I recommend a flat iron rather than a curling iron because it makes the newly added curls naturally blend in with the others.
Note: As you can see, I'm no photographer! These pictures just don't give justice to the actual style. My finished hair is not completely flat on top like in the picture to the left. I encourage anyone who has wavy hair with "curl potential" to give this a shot! Sometimes my hair will get super curly when I do these steps. This time it was just an average amount of curls but it still gave me a nice look for today's Easter gatherings! :)
No comments:
Post a Comment